How to Host Static Gatsby Website on AWS
I had a blog built using Gatsby and its starter library gatsby-starter-blog. It was hosted on AWS using the following services.
- Route 53
- Certificate Manager
- S3
- CloudFront
1. Route 53
I bought likaiguang.com. Created a hosted zone, hosted zone is a container for records (A, CNAME) about how to route traffic for a domain.
2. Certificate Manager
I first made sure the region selected was US East (N. Virginia) us-east-1, because later in CloudFront it would only show certificates in this region in the drop-down menu. Then I requested a SSL/TLS public certificate with the following domain names.
- likaiguang.com
- www.likaiguang.com
Validation was done by the CNAME method, AWS added some convenience by automatically adding the DNS records.
3. S3
I created an S3 bucket named likaiguang.com using a region near me: US West (Oregon) us-west-2.
S3 Bucket: likaiguang.com
Under Tab: Properties
I enabled bucket for static website hosting, selected Use this bucket to host a website and put index.html as index document, 404.html as error document.
Under Tab: Permissions
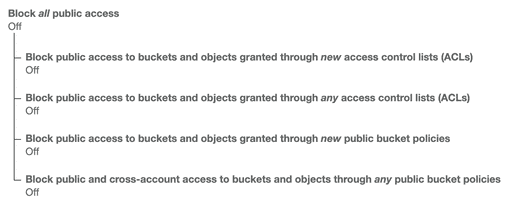
This was the bucket for storing my website, so I set the Block public access by turning off the four options below.
I set the Bucket Policy per below.
{
  "Version": "2012-10-17",
  "Statement": [
    {
      "Sid": "LikaiguangPublicRead",
      "Effect": "Allow",
      "Principal": "*",
      "Action": ["s3:GetObject"],
      "Resource": ["arn:aws:s3:::likaiguang.com/*"]
    }
  ]
}
Upload Website from Gatsby Blog Repo
I installed AWS CLI on my local machine, created a IAM user and give it access to my S3 buckets. Ran aws configure to give it both Key ID and Access Key for the IAM user.
I installed Gatsby plugin npm i gatsby-plugin-s3. This enabled me to deploy the website to my S3 bucket in my Gatsby blog repo.
I added following configurations in the gatsby-config.js file.
{
  resolve: `gatsby-plugin-s3`,
  options: {
    bucketName: `likaiguang.com`,
    acl: null,
    protocol: `https`,
    hostname: `likaiguang.com`,
  },
},
I added script "deploy": "npm run build && gatsby-plugin-s3 deploy", in the package.json file.
Ran npm run deploy to build and upload my website to the S3 bucket.
4. CloudFront
In the distribution creation, I set the Origin Domain Name to the S3 Website endpoint likaiguang.com.s3-website-us-west-2.amazonaws.com, not the S3 API endpoint likaiguang.com.s3.amazonaws.com from the drop-down.
Changed Viewer Protocol Policy to Redirect HTTP to HTTPS.
Under Alternate Domain Names (CNAMEs) I added the two domain names.
- likaiguang.com
- www.likaiguang.com
Under SSL Certificate I selected Custom SSL Certificate (example.com): and chose the certificate in the drop-down I created previously in Certificate Manager.
Left everything else in default.
After creation, I was given a domain name for my distribution dryg4r2wprzbd.cloudfront.net.
5. Back to Route 53
After the CloudFront distribution was deployed, go back to the Route 53 console.
I added an A record for likaiguang.com pointing to the ALIAS dryg4r2wprzbd.cloudfront.net CloudFront distribution.
I added a CNAME record for www.likaiguang.com pointing to the same CloudFront distribution.
After the DNS propagate, my website should be online with https shortly.
6. Extra Credit: Restrict S3 Bucket Access Policy to a Specific HTTP Referer Header
Note: Referer is a misspelling of "Referrer", details can be found on this Wikipedia page.
Update the CloudFront distribution Origin Custom Headers with a custom Referer header:
- Header Name: Referer
- Value: likaiguang.com
Then update the S3 Bucket Policy to restrict access to this header with the following condition added.
{
  "Version": "2012-10-17",
  "Statement": [
    {
      "Sid": "LikaiguangPublicRead",
      "Effect": "Allow",
      "Principal": "*",
      "Action": ["s3:GetObject"],
      "Resource": ["arn:aws:s3:::likaiguang.com/*"],
      "Condition": {
        "StringLike": {
          "aws:Referer": ["likaiguang.com"]
        }
      }
    }
  ]
}
Test the website to make sure everything works.
